@font-face { font-family: Wingdings }
@font-face { font-family: 宋体 }
@font-face { font-family: “Cambria Math” }
@font-face { font-family: 微软雅黑 }
@font-face { font-family: “@微软雅黑” }
@font-face { font-family: “@宋体” }
p.MsoNormal, li.MsoNormal, div.MsoNormal { mso-style-unhide: no; mso-style-qformat: yes; mso-style-parent: “”; margin: 0 0 0.0001pt; text-align: justify; text-justify: inter-ideograph; mso-pagination: none; font-size: 10.5pt; mso-bidi-font-size: 12.0pt; font-family: “Times New Roman”, serif; mso-fareast-font-family: 宋体; mso-font-kerning: 1.0pt }
a:link, span.MsoHyperlink { mso-style-unhide: no; color: rgba(5, 99, 193, 1); mso-themecolor: hyperlink; text-decoration: underline; text-underline: single }
a:visited, span.MsoHyperlinkFollowed { mso-style-unhide: no; color: rgba(149, 79, 114, 1); mso-themecolor: followedhyperlink; text-decoration: underline; text-underline: single }
code { mso-style-priority: 99; mso-ansi-font-size: 12.0pt; mso-bidi-font-size: 12.0pt; font-family: 宋体; mso-ascii-font-family: 宋体; mso-fareast-font-family: 宋体; mso-hansi-font-family: 宋体; mso-bidi-font-family: 宋体 }
pre { mso-style-priority: 99; mso-style-link: “HTML 预设格式 字符”; margin: 0 0 0.0001pt; mso-pagination: widow-orphan; font-size: 12pt; font-family: 宋体; mso-bidi-font-family: 宋体 }
span.HTML { mso-style-name: “HTML 预设格式 字符”; mso-style-priority: 99; mso-style-unhide: no; mso-style-locked: yes; mso-style-link: “HTML 预设格式”; mso-ansi-font-size: 12.0pt; mso-bidi-font-size: 12.0pt; font-family: 宋体; mso-ascii-font-family: 宋体; mso-hansi-font-family: 宋体; mso-bidi-font-family: 宋体 }
span.nt { mso-style-name: nt; mso-style-unhide: no }
span.nb { mso-style-name: nb; mso-style-unhide: no }
.MsoChpDefault { mso-style-type: export-only; mso-default-props: yes; font-size: 10pt; mso-ansi-font-size: 10.0pt; mso-bidi-font-size: 10.0pt; mso-ascii-font-family: “Times New Roman”; mso-fareast-font-family: 宋体; mso-hansi-font-family: “Times New Roman”; mso-font-kerning: 0pt }
@page { mso-page-border-surround-header: no mso-page-border-surround-footer: no }
@page WordSection1 { size: 595.3pt 841.9pt margin-top: 72pt margin-right: 59.55pt margin-bottom: 72pt margin-left: 59.55pt mso-header-margin: 42.55pt mso-footer-margin: 49.6pt mso-paper-source: 0 layout-grid: 15.6pt }
div.WordSection1 { page: WordSection1 }
Gitlab-CI持续集成之Runner配置和CI脚本
一、简介
1. 为实现持续集成,需为该项目准备以下两样东西:
1)软件集成脚本.(gitlab-ci.yml)
2)一台Runner服务器
当然,考虑到集成环境的配置,还需要docker镜像作为载体。
2. 基本流程如下:
1)安装Runner服务器,注册和项目对应的Runner Service(后续再说Shared Runner),编写集成脚本;
2) 每当push代码, 自动触发脚本,Gitlab将变动告知Gitlab-CI,CI连接Runner服务器,找到关联的Runner Service,Runner负责更新代码到本地,并执行集成脚本。
二、安装Runner
1. Centos7使用yum安装
1)添加yum源
a.官方源
1 curl –L https://package.gitlab.com/install/repositories/runner/gitlab-ci-multi-runner/script.rpm.sh | sudo bash
b.国内源
cat << EOF >> /etc/yum.repos.d/gitlab-ci-multirunner.repo

[gitlab-ci-multi-runner]

name=gitlab-ci-multi-runner

baseurl=https://mirrors.tuna.tsinghua.edu.cn/gitlab-ci-multi-runner/yum/el7

repo_gpgcheck=0

gpgcheck=0

enabled=1

gpgkey=https://packages.gitlab.com/gpg.key

EOF
sudo yum makecache
2)安装1.11.2版本
sudo yum install gitlab-ci-multi-runner-1.11.2-1
由于公司Gitlab版本目前是8.X,官方Gitlab最新是9.0,Runner最新版不支持9.0以下版本的Gitlab,因此只能安装该版本。视Gitlab服务器的版本而定。
3)Runner用户权限
Runner默认会在服务器上创建gitlab-runner用户, 所有的Runner Service则默认通过该用户执行集成脚本,因此该用户需要较高的权限。尤其是使用Docker镜像时,必须加入docker组。
sudo usermod -aG docker gitlab-runner
2.Ubuntu使用apt-get安装
1)添加apt源
curl -L https://packages.gitlab.com/install/repositories/runner/gitlab-ci-multi-runner/script.deb.sh | sudo bash
2)安装1.11.2版本
sudo yum install gitlab-ci-multi-runner-1.11.2-1
3)Runner用户权限(同上)
3.安装包安装
下载二进制文件或相应系统的安装包安装即可,gitlab-ci-multi-runner-1.11.2安装包。
三、注册Runner
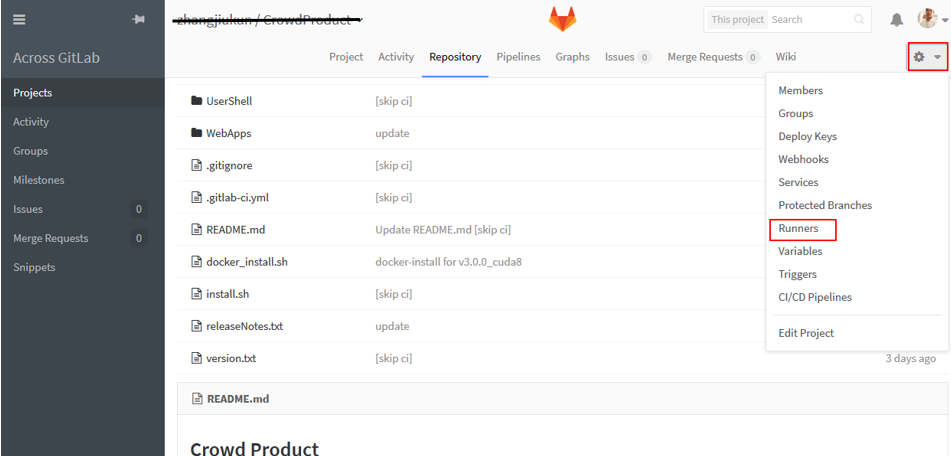
1.进入自己的Project—>设置Runners
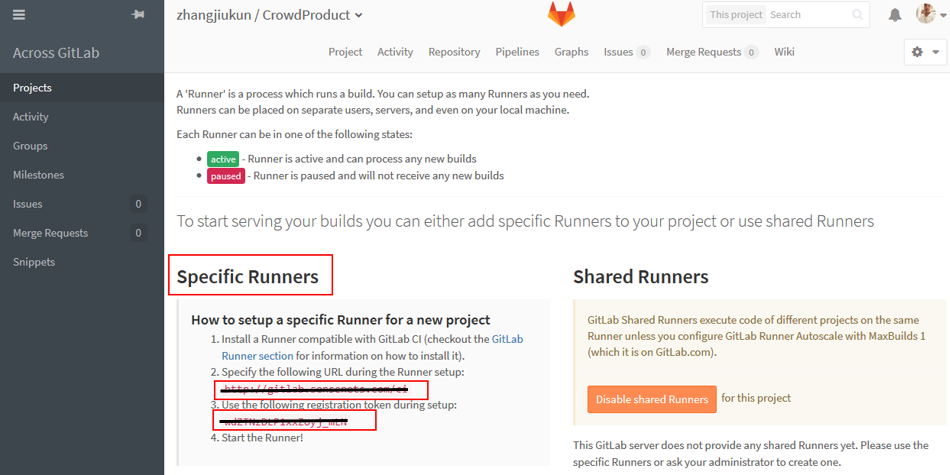
2.查看Specific Runners里面的url和token
3.在Runner服务器执行注册命令
gitlab-runner register --non-interactive

    --url http://gitlab.xxxxx.com/ci

    --registration-token GWGGXZNxbxabcdMaXZhj9

    --name Crowd_Job_CI

    --tag-list 172.17.3.126

    --run-untagged=true

    --executor shell

    --builds-dir /home/gitlab-runner

   --config "/etc/gitlab-runner/config.toml"
上述命令选项含义(*为必选项):
–url 项目CI地址*
— registration-token 项目里刚才看到的token,互相关联的标志*
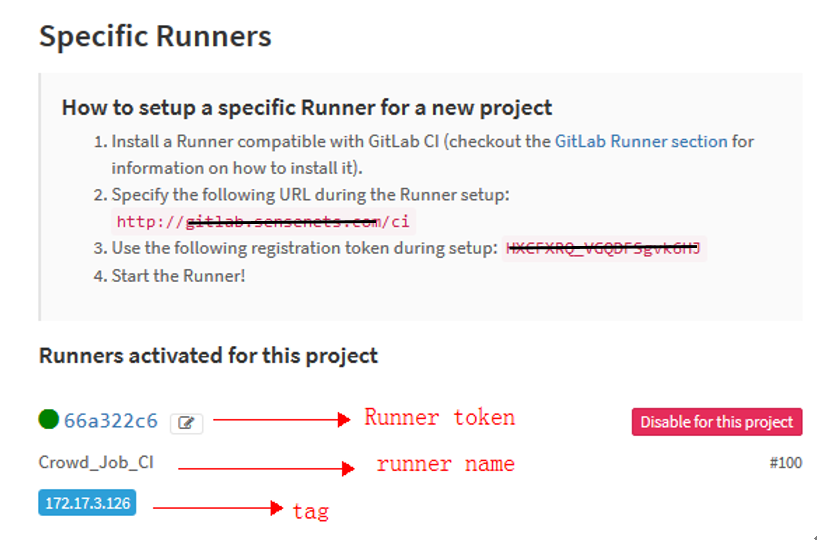
–name 该Special Runner服务名,便于后台管理(查看、删除、调用)*
–tag-list 该Special Runner标签,集成脚本中可以通过指定tag关联
–run-untagged 是否运行无标签的集成脚本,必须用等号
–excutor 规定集成脚本执行的环境,还可以是docker等*
— builds-dir 默认该文件夹,可以自定义项目集成初始化的位置
–config 默认配置文件,存储注册信息,可以自定义不同的配置文件
刷新页面看到已经注册成功,可以使用了。
四、运行Runner
假设集成脚本已就绪,那么就需要运行Runner
1.使用Specific Runner
1)run-single
gitlab-ci-multi-runner run-single

--url http://gitlab.sensenets.com/ci

--token 37fe0fa59e3475e20e24b6e6afc7c3

--executor shell
当然这里也可以指定注册时的大部分参数,不过无论如何url、token(Runner的token,而非注册时项目的token)、executor这三个参数是必须的。
run-single命令很简单的把我们刚才注册的Runner运行起来了,如果这个Runner对应的项目有更新,这个运行的服务就会去执行脚本内容。
即便我们不运行run-single命令,默认会有一个已经运行状态的Runner Service,名称就是gitlab-runner,会自动执行所有注册过的Runner,但同时只能执行一个任务。

2)run 、install、start
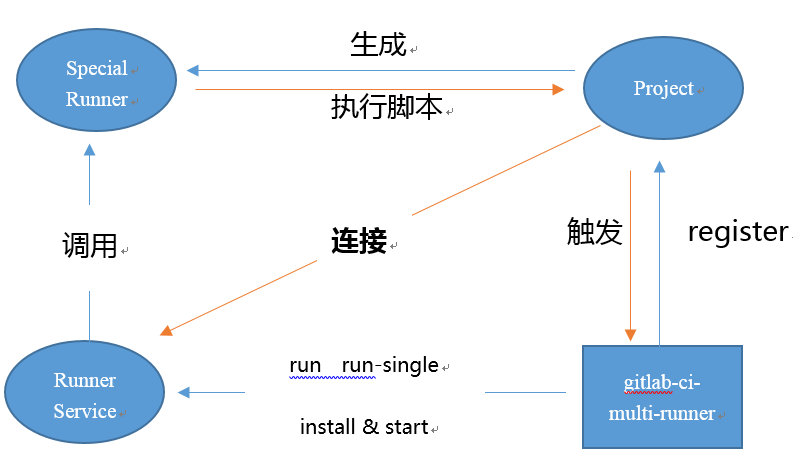
上图说明了Runner的原理:
安装gitlab-ci-multi-runner服务器,相当于一个劳务公司的创办,它管理Runner工人,外包各种项目Project。
注册的目的是把项目和Runner连接起来,因为部分项目的Runner可能需要定制。Runner好比是一个工人,在劳务中心(gitlab-ci-multi-runner)登记合同,供职于我们的Project(但是当他比较闲的时候,也可以去其他公司兼职)。
但是对应的RunnerService相当于Runner工人的管理层,一个管理层可以管理一个甚至多个工人。劳务公司默认有一个公用的管理层,服务名就是上面所说的gitlab-runner,如果我们不指定管理层,那么劳务公司所有工人都被gitlab-runner管理运行。这个管理人员比较弱,一次只能管理一个项目,其他项目会等待。
run、run-sigle相当于一次性的外包项目,非常具有针对性。
install则是把一个或者几个runner包装好,然后start,就是一个有着管理服务的工人体系,随时待命。
当Project更新,触发Runner服务器上的Runner Service(某管理队伍),Runner Service根据自己的配置信息,和项目的需求(tag指定某个工人),派遣Runner工人去执行Project给予的任务(Job)。
配置信息相当于花名册,不注册仅仅写一个花名册是不行的,working_dir相当于办公地点。
下面安装两个服务并启动:
gitlab-runner install

    -n  "jiukun_self_runner"

    -d "/home/jiukunz"

    -c "/etc/gitlab-runner/config_jiukun_test.toml"

    -u gitlab-runner
gitlab-runner install

    -n  "jiukun_self2_runner"

    -d "/home/jiukunz"

    -c "/etc/gitlab-runner/config_jiukun_test.toml"

    -u gitlab-runner
1 gitlab-runner start -n jiukun_self_runner
2 gitlab-runner start -n jiukun_self2_runner
其中,-n为安装的服务名称,-d为工作路径,-c为配置文件,-u为执行用户(服务名称和执行用户必须指定,配置文件和工作路径可以使用默认路径)

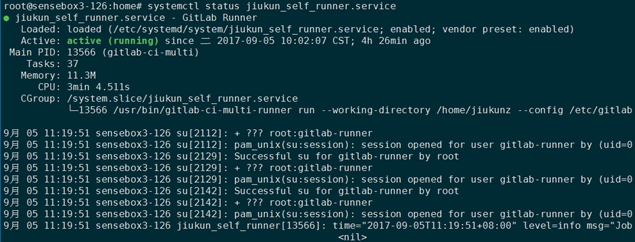
其实,当我们执行上述安装命令时,gitlab-ci-multi-runner后台实际是将run命令写入/etc/systemd/system/jiukun_self_runner.service文件,使之成为一个单独的服务:

2.使用Shared Runner
使用share runner需要管理员权限,联系公司gitlab管理员,获取token。然后使用和Special Runner一样的方法注册成功。
进入任意项目的Runner页面,将看到以下内容:
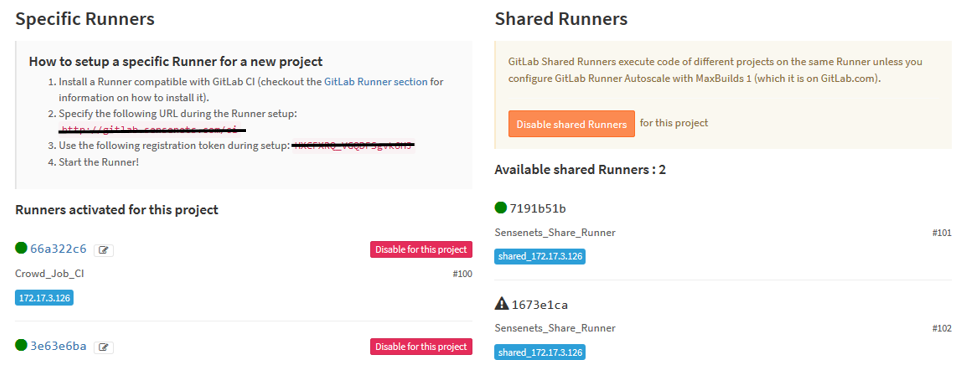
这里我重复注册了两次,可以看到Runner无论是名字还是tag都可以重复,但是Runner的token却不相同,实际上区分不同的Runner工人只需要两样东西就是url和token。当然并不建议进行相同命名,不便于管理。
公司所有的项目默认都可以使用Shared Runner,而不需要重复配置。
1)好处:对于大多数Runner的配置其实是完全相同的(同样的executor,同样的配置文件和工作路径,同样的依赖环境),如果每个项目都去一个个注册不仅麻烦,而且不方便迁移,这时可以使用shared runner。
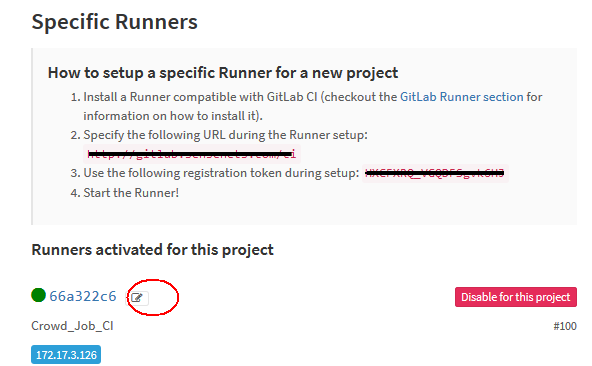
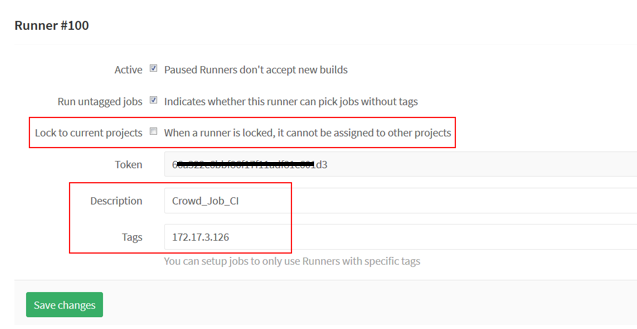
2)不足:如果一个项目的编译所需的exector等其他配置(配置文件有更多可选配置),并且和其他项目需要单独管理,这时最好使用Special Runner,并锁定该Runner为项目本身使用,单独管理。
五、管理Runner
1.注册的runner列表
gitlab-runner list
    --config "/etc/gitlab-runner/config_jiukun_test.toml"
2.查看runner连接状态
gitlab-runner verify
    --config "/etc/gitlab-runner/config_jiukun_test.toml"
3.取消注册(移除)
gitlab-runner unregistry
    --url http://gitlab.xxxxxx.com/ci
    --token 9c1bb50065661ba766023016f6ebf2
不能直接在project的web端进行remove操作,否则这里会执行失败
4管理gitlab-runner服务
gitlab-runner status

    -n jiukun_self_runner.service

    不指定服务名,则默认为gitlab-runner服务

gitlab-runner stop

    -n jiukun_self_runner.service

gitlab-runner restart

    -n jiukun_self_runner.service

gitlab-runner uninstall

    -n jiukun_self_runner.service
执行uninstall会卸载该服务,与之对应的runner将无法通过该服务运行,请确保对应的CI任务已停止。
六、集成脚本
将集成脚本命名为.gitlab-ci.yml或者.gitlab-ci.yaml,放置在对应项目仓库分支的根目录下。

1. yaml语法
大小写敏感、使用缩进代表层级、不允许使用Tab缩进,只能使用空格,缩进并无统一限制,但同级关系内要保持对齐即可。#代表注释。
语言格式里存在减号和冒号这些特殊字符,因此要注意千万别写成中文的字符格式。
减号对应的是数组,冒号对应的是键值对(对象)。
2. 关键词
1)image
如果使用docker作为Runner的executor,并且没有设置默认的镜像,此处需要设置镜像;不使用可以省略
2)sevices
如果使用docker集群服务,可以直接调用服务;不使用可以省略
3)stages
定义各个阶段名称,如果省略,CI默认为三个阶段

每个job都必须定义其所属的阶段,如果不定义,默认均属于build阶段;同阶段任务并行对待,上一阶段所有任务执行成功,才会继续执行下一阶段;语句依次执行,如果某一语句执行失败,将返回错误码,并宣告CI失败。
如果定义stages,则job中的stage必须与之相对应。
4)before_script
定义在所有脚本运行之前执行的语句
5)after_script
定义在所有脚本运行之后执行的语句
6)variables
定义环境变量

7)cache
定义下个job会使用到的文件或内容
3. Jobs
.gitlab-ci.yml脚本内容的主体为一个个job,没有数量限制,每个Job名称可以相同也可以不同(最好不要相同),可以大小写;每个Job内部至少有一个关键词。常用关键词如下
1)stage
和脚本全局stages对应(如果全局未定义,可使用默认)
2)image、services、variables
同全局关键词
3)only
规定该脚本响应分支(项目其他分支不会触发该脚本;如果不定义,会检测所有分支;与之相反的关键词是except)
4)before_script、after_script
同全局关键词(注意,如果同时存在,会覆盖全局关键词对应列表内容)
5)script
脚本主体,使用方法和在shell内一样,将在对应executor内运行一个shell环境,执行脚本内容。每个Job的shell环境不同(Job结束,该环境自动关闭)。
6)tags
指定Runner的标签(通常一个项目有很多Runner,依靠tag区分)
7)artifacts
指定Job的产出文件路径,如果该关键词设定,可以直接在pipeline页面下载该文件
8)when
默认一个job只有在上一阶段所有job成功才会执行,通过when可以改,通常用来清理环境使用,以免失败后无法清理,有四种可选参数。
on_success(上一阶段所有Job成功才执行)
on_failure(上一阶段任意Job失败就执行)
always(总是执行)
manual(此阶段由UI界面交互执行)
备注:以上纯属原创,学习来源为gitlab-runner官方中文文档、gitlab-runner英文文档、gitlab-ci英文文档。如需转载请注明出处,后续继续完善。
